- Mitglied seit
- 26. Jun 2023
- Beiträge
- 17
- Punkte für Reaktionen
- 2
- Punkte
- 9
ATTENTION:
before starting to do the guide you must READ it and understand what you are doing however precise it may be, problems may arise outside of it that I do not know about, therefore I do not assume any responsibility for damages caused by following the guide or part of it it, mine just wants to be a guide to help those who are less familiar with this type of device and unlock planned obsolescence if the devices still work and it is still better to use them.
the rule "your things, your problems" applies
- Necessary supplies (which I will post gradually in the guide):
Hardware:
- How to check compatibility:
go to this site and to this site, use the search button on your browser (ctrl+f) and look for your model, which CPU it mounts, RAM and how many Bays it has;
In my case DS110J mounts:
CPU: Marvell Kirkwood mv6281 800Mhz ARM
SATA, 16-bit Memory Bus,
128MB of RAM
in search bar write (in my case) "Marvell Kirkwood mv6281 ARM" and you found all model compatible, see also frequency processor device if is similar or major possible similar (in my case) DS112J has:
CPU: Marvell Kirkwood mv6281 1.0Ghz ARM
128MB of RAM
and compare all settings
From now on I will refer to DS110J and DS112J, but if you have different models the
"DS110J = your physical device"
"DS112J = compatible device to emulate"
Having said that we can start:
THIS PROCEDURE WILL ERASE ALL DATA IN THE SYNOLOGY, SECURE ALL YOUR DATA OR MAKE A BACKUP BEFORE PROCEEDING
-If you don't have a working Synology DS110, continue with the guide, if you do have a working one, skip this step.
1. insert a new hard disk/ssd, connect directly by LAN cable on your pc/laptop and start the DS110J, a flashing Orange led will come out on status, you must download the latest version of the DS110J available here or exactly here (164mb file)
2. install Synology Assistant on your pc DESKTOP UTILITY SECTION and download it for your OS
3. after installed synology assitant , the program found your DS110J and ask to you to install the latest DSM, put in your latest (164mb file) and click next button
4. Synology Assistant start to formatting and install all proprieties, partition and other stuff, when all is finished (no problem if return back message CONNECTION LOST FOR LAST STEP, important is go to web interface)
- Now you have a working device with latest DSM available for your device
1. login with "admin" user and password you have selected when you have installed the latest DSM.

2. go to control panel ---> Advance Mode (corner up-right) --> Terminal & SMNP

3, now download and install Putty, open it and set the synology ip address (see in synology assistant what is the ip) :

4. now appear warning message go to accept and go to terminal with a login user
user: root
password: (same password you have selected for admin user)
5. now type in terminal:

6. WARNING NOW YOU CAN BRICK YOUR SYNOLOGY IF YOU WRITE WRONG VALUE, PAY ATTENTION
Press the letter " i " on your keyboard move the green square with keyboard arrow and change value in follow line:

press ESC on your keyboard and write :wq for save and exit, (if you have wrong values write only :q for exit without save, close putty and repeat the process from step 3)
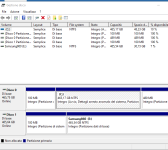
7. close putty (now we don't need it) and go to the synology web interface for checking if we see is DS112J also in Synology Assistant if is same
DON'T POWER OFF or DON'T RESTART the device because is temporally DS112J and file go to corrupt if you power off or restart. (if you have do it go to step 1 and repeat process)
8. download DS112J 5.2 UPDATE 9 here and install it with manual install from control panel
9. after install you will appear with this:

we need to do this step to fix the proprieties permanently signed by synology last modified.
in next post i follow the hard step
before starting to do the guide you must READ it and understand what you are doing however precise it may be, problems may arise outside of it that I do not know about, therefore I do not assume any responsibility for damages caused by following the guide or part of it it, mine just wants to be a guide to help those who are less familiar with this type of device and unlock planned obsolescence if the devices still work and it is still better to use them.
the rule "your things, your problems" applies
- Necessary supplies (which I will post gradually in the guide):
Hardware:
- Synology Nas Ds110J (or your own model)
- HDD/SSD (i prefer SSD to lighten the efforts to the Synology)
- Sata Station (box hdd is same, or sata reader)
- Lan Cable (if is possible cat 6 1Gb/s transfer)
- Pc or Laptop (i've win10)
- DSM 5.2 5967 (164mb file) for DS110J (or latest DSM 164/300mb for your own model)
- Update file "DSM 5.2 5967 update 9" for Ds112J (or latest update DSM for model compatible selected)
- DSM 6.2.4 (300mb file) for DS112J (or latest DSM 300mb for compatibile model)
- Synology Assistant
- Putty
- How to check compatibility:
go to this site and to this site, use the search button on your browser (ctrl+f) and look for your model, which CPU it mounts, RAM and how many Bays it has;
In my case DS110J mounts:
CPU: Marvell Kirkwood mv6281 800Mhz ARM
SATA, 16-bit Memory Bus,
128MB of RAM
in search bar write (in my case) "Marvell Kirkwood mv6281 ARM" and you found all model compatible, see also frequency processor device if is similar or major possible similar (in my case) DS112J has:
CPU: Marvell Kirkwood mv6281 1.0Ghz ARM
128MB of RAM
and compare all settings
From now on I will refer to DS110J and DS112J, but if you have different models the
"DS110J = your physical device"
"DS112J = compatible device to emulate"
Having said that we can start:
THIS PROCEDURE WILL ERASE ALL DATA IN THE SYNOLOGY, SECURE ALL YOUR DATA OR MAKE A BACKUP BEFORE PROCEEDING
-If you don't have a working Synology DS110, continue with the guide, if you do have a working one, skip this step.
1. insert a new hard disk/ssd, connect directly by LAN cable on your pc/laptop and start the DS110J, a flashing Orange led will come out on status, you must download the latest version of the DS110J available here or exactly here (164mb file)
2. install Synology Assistant on your pc DESKTOP UTILITY SECTION and download it for your OS
3. after installed synology assitant , the program found your DS110J and ask to you to install the latest DSM, put in your latest (164mb file) and click next button
4. Synology Assistant start to formatting and install all proprieties, partition and other stuff, when all is finished (no problem if return back message CONNECTION LOST FOR LAST STEP, important is go to web interface)
- Now you have a working device with latest DSM available for your device
1. login with "admin" user and password you have selected when you have installed the latest DSM.
2. go to control panel ---> Advance Mode (corner up-right) --> Terminal & SMNP
3, now download and install Putty, open it and set the synology ip address (see in synology assistant what is the ip) :
4. now appear warning message go to accept and go to terminal with a login user
user: root
password: (same password you have selected for admin user)
5. now type in terminal:
and press entervi /etc.defaults/synoinfo.conf
6. WARNING NOW YOU CAN BRICK YOUR SYNOLOGY IF YOU WRITE WRONG VALUE, PAY ATTENTION
Press the letter " i " on your keyboard move the green square with keyboard arrow and change value in follow line:
- line 1: unique": "synology_88f6281_110j -> unique": "synology_88f6281_112j
- line 236: upnpmodelname="DS110j" -> upnpmodelname="DS112j"
- line 251: synobios="ds110j" -> synobios="ds112j"
press ESC on your keyboard and write :wq for save and exit, (if you have wrong values write only :q for exit without save, close putty and repeat the process from step 3)
7. close putty (now we don't need it) and go to the synology web interface for checking if we see is DS112J also in Synology Assistant if is same
DON'T POWER OFF or DON'T RESTART the device because is temporally DS112J and file go to corrupt if you power off or restart. (if you have do it go to step 1 and repeat process)
8. download DS112J 5.2 UPDATE 9 here and install it with manual install from control panel
9. after install you will appear with this:
we need to do this step to fix the proprieties permanently signed by synology last modified.
in next post i follow the hard step